The Construction of a Combat Robot Arena
This robot combat arena started out as a way for my kids to practice and the more I have learn about the combat robot community, the more I want to contribute to the community as well.


I have been piecemeal'ing this thing together and I think I have finally settled on a size (8' x 6'). But the plan is for it to be modular and simple to assemble. Many thanks to the combat robot community for their advice, insight, and guidance during this 'build in progress'. You can click here to see the arena plans (my personal doodles) I am using for this build.
NOTE: the build will go in reverse chronological order so you will need to scroll down for the older stuff.
Into Place
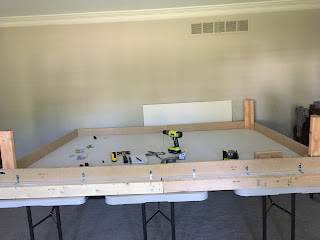
Getting the roof to a place where I am comfortable with is has been a bit of a struggle. The vertical beams were going to be unstable so, that first thing I needed to do was to stabilize them. I ran through a couple of options in my head and decided that bolting them down was going to be the way to go. It was off of to my local box hardware store to see what bolts would work the best.
I settled on a 3" long, 3/8 bolt and nut set up. This worked out better than I had imagined. The stability of the vertical beams was no longer in question. The vertical beams were 47 inches high, giving an overall height of approximately 50 inches.

Once all four vertical beams were in place, then it was just a matter of sliding the horizontal beams into place (or so I thought).
As it turns out, I didn't measure everything correctly and the tolerances were off. But overall, everything is set-up and it is stable. And, it will require a change at some point, as I don't know how I feel about gravity holding to top beams in place.

Working on the Lid
Sometimes, I only have an hour or so to work on the arena. That was the case this weekend. I managed to purchase the lumber to make the legs and ceiling and after getting it all home, life took a crazy turn. Part of the combat robot scene for me is that I enjoy the stories of tragedy and triumph. Well, there are times that that I can get a lot of work done and there are times that I can get a little work done. In either case, progress is made. For me, this is about the journey. I have said before I am not an engineer so as part of my journey I am picking up a number of new skills.
Today I managed to make a couple of the ceiling beams but didn't get them all done. Too much life happening for that.
So here is the progress made so far.


The front beam turned out nicely. The measurements were spot on and everything fit well. Then I started to get pressured for time and made make mistakes with the side beam. It took several tries before I got it to line up properly but I finally got the numbers to work out. This requires me to make another cut, but before I do, I want to get the back beam setup in order to have the exact numbers that I will need for the sides.
As an additional note, I had concern that the ceiling beams would be too heavy for the modular nature of what I was trying to accomplish with the arena. Let's face it, I am not as young as I used to be and not nearly as strong. So I need to be able to set up and tear down with minimal to no help. Great news is that the beams are not too heavy. So now the next steps are to complete the other beams and build the legs out so that the ceiling will be at least 4 feet high.
Raise the Roof

So, I know that I am going to have 48" of height with the Lexan. With this in mind, I will need a pretty sturdy foundation to not only attach the ceiling of the arena but also to hold the poly carb in place during events. I am working on designs for how to do that, and the reality is that it is in the planning phases. I was originally going to go with aluminum extrusion to hold the Lexan but, then I think I went to Lowes one too many times and ultimately decided to go with lumber. I know the preliminary design legs are not tall enough to accommodate the height requirement. And, these tiny little legs will help me build the ceiling support beams.
Once again, thinking in the land of modular, I came up (though I am sure lots of people have done this) with a way to slide the ceiling beams onto the support legs (and then, maybe bolt together). I have yet to determine how high I need to make the supports (I am sure I could just do the maths, but one thing at a time). However, I do know how I want all of this to fit.

Each of the supports will simply be a couple of 2' x 4' s nailed together (see above). Two 2" x 6" beams will be joined on each end by a 5" long piece of 2" x 4" and if all goes well the beam will slide into place on the support. I don't know if this concept doodle does it justice. But for the sake of argument, here ya go. And it goes without saying, each side of the arena gets a support beam. I mean this is a doodle after all not a full blown CAD drawing. :-)

Now, you may be saying, you are taking arena space to put those beams where you are putting them. Yes, and (I like yes, ands). And, I think that I will add a wall that goes from the floor to the ceiling that cuts the beams off from the arena. Think boxing ring mats except not soft, and goes from bottom to top. Maybe this makes more sense in my head than it does from a practical standpoint. And, if I ever wanted to add a button operated drop pit, I have four built in places to add one.
And that is where I am at for the moment. Currently, I am working on the doodles to build out the flats that will hold the Lexan, afix to the ceiling and support beams, and some how move out of the way to get bots in and out. But, alas that is for another time.
Hrm, Upgrades
When interacting with the bot community, I ultimately decided to go for broke and build something that could house beetle weights as well. I don't know how wise of a decision this was but, here I am. I managed to find a good source for Lexan (well, I hope), and I decided to go with 3/8 inch panes.
Now here is the kicker, I was originally going to build a 4' x 6' arena. Um, yeah. So I ended up making it 8' x 6'.
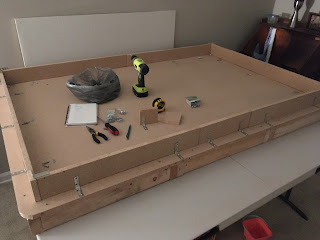
First I had to buy another folding table. I felt it better to have 3 to support the weight. With modularity in mind, I built the additional foundation components. This way I could shrink it back down to a 4' x 6' arena if I choose to go a smaller event, like a makers fair at the local library.

Then, just as before, I cut down the MDF to and used the remaining to make additional kick plates. I can already see that I am going to want to go with plywood kick plates. Looking ahead, as I work on the ceiling, I will need the added strength to bolt the legs of the celing to the kick plates. That will be more clear as I share more


You can seen the original 4' x 4' plywood floor in the background of the photo to gain a little perspective.
Putting it all together
For the kick plates I used the angle braces to hold them down. The angle braces also serve to provide my spacing for what will hopefully hold the Lexan. These are some pictures of how all of that come together.
The wood screws were used to affix the single sheet of MDF to the foundation. The nails were used to build the 2x4 foundation components.


Nuts and Bolts, Hardware, Yeah All of that Stuff
So part of the reason I am posting this is because I need to be able to remember what I have done, tried, and just so that I have one place that I can go back to find all of the information that I have been gathering. So here are some photos of the nuts and bolts of how things are held together.

Nails

Wood Screws

Screws and Nuts

Prettying up the arena just a bit.
As we are starting to get back into the swing of life 'ish, I have had a little time to focus on making things nicer. Well, at least I was able to paint again. I've also turned it in preparation for expanding to an 8' x 6' arena.

Just a little cramped
Hexbugs and 150 g bots do well in this arena. However, once you get into 1 pound and above it is obvious that space is a premium that must be considered. So, it has been about a month or so and now the itch to have more space has kicked in. I also (cough cough) wanted to test the feasibility of the modular design. So back down to my local hardware chain to my more wood. Well, from the leftovers from last time I only need a 2 x 4 and a sheet of 8 x 4 MDF. Additionally, I wanted to start accounting for eventuality of Lexan. So, I built another 4' x 2' frame base, cut the MDF sheet down to 4' x 6' and widened out the arena a bit.
I used the remaining MDF to make the kick plates and purchased the hardware to bracket and bolt everything down. At this point, I also added a section that could be removed to add a pit when I felt like it. Oh, there was expressed concern about the safety of the corners, so I had to round those off. Fun fun fun.

It just looks nicer.
That arena did not stay in the garage for long. With the pandemic in full swing the kids and I were spending a lot of time together. We were enjoying the arena, but I felt like the floor was becoming more of an eyesore. So, I decided to paint it. I think it turned out okay.


The first challenge.
Looking at my handy work I noticed a glaring flaw. There was no way my kids were not going to drive their bots off the end of the arena. I pretty much blew my budget on the initial run of materials so I had to improvise with materials I already had. Luckily, I had 2 sheets of 8' x 4' white shower panel that I had been using as a knock off white board. So I cut one down into 1' by 4' lengths and used the siding as a enclosure of sorts. I did end up having to purchase some brackets to hold things together, but that was negligible, and the panels certainly served their purpose.


Tell me something wood ...
From the beginning, I knew that I wanted to do some thing more modular. Basically, I wanted to be able to grow the arena with as little hassle as possible. So even at this point I was making everything to work in factors of 2 and 4. The first two framing bases were 4' x 2' and then they were placed side by side with a sheet of 3/4 ply screwed into the top.


The start of something more
The first arena turned out to not be enough. By this time my daughter had her first bot (a Viper2 kit) and I had started building 150 g bots. The arena was sufficient for the 150 g bots and those things were (and are at the writing of this) slow. But I had a hair-brained idea that I wanted to make a video during the pandemic and spawned the desire to build a little bit better arena. So I went and purchased some wood.

To build an arena.
I got a wild hair one day decided to build an arena for my kids hex bugs. Really, I got tired of them driving them all over the floor and wanted to contain the excitement a bit.
Here is a picture of that first arena.


Comments
Post a Comment